Several weeks ago, I wrote a custome color picker for iphone app, I mainly use Quartz2d Graphics drawing the view. The function is simple, just allow user to select a color. Today I will make a summary for this work, you can download the demo project here. You need XCode4.6 to compile this project.
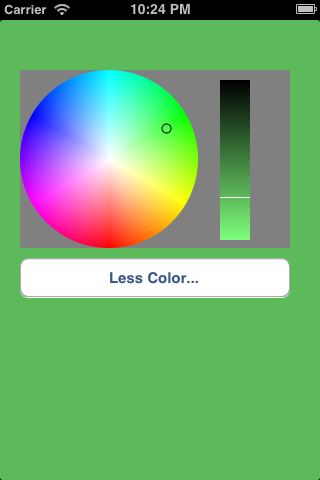
There are two types of Color picker. One is GridColorPicker which contains colored rectangles in rows and columns. Each rectangle in grid represents one color, user can click one rect to make a selection. The other is WheelColorPicker, all color is in a circle, user can click to select a hue, then use a vertical bar to select a color.
Here are sceenshot(you can use button below to change between these two views).The background color changes with color user selected.
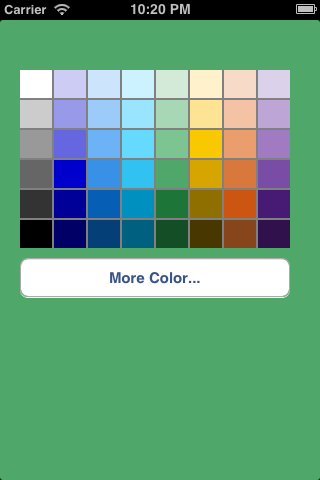
###Grid Color Picker
For grid color picker, we just need to first get positions of all rects and corresponding color. Then draw these colored rects in drawRect method. Code snippet(not complicated, you can refer to the source code for detail):1
2
3
4
5
6
7
8
9
10
11
12
13
14
15- (void)drawRect:(CGRect)rect
{
CGContextRef context = UIGraphicsGetCurrentContext();
CGContextSetFillColorWithColor(context, [UIColor grayColor].CGColor);
CGContextFillRect(context, rect);
for (int row = 0; row < COLOR_GRID_ROW; ++row) {
for (int col = 0; col < COLOR_GRID_COL; ++col) {
UIColor* color = [self colorFromInt:LESS_COLOR_TABLE[row * COLOR_GRID_COL + col ]];
CGRect colorRect = [[colRectArray objectAtIndex:COLOR_GRID_COL * row + col] CGRectValue];
CGContextSetFillColorWithColor(context, color.CGColor);
CGContextAddRect(context, colorRect);
CGContextFillPath(context);
}
}
}
###Wheel Color Picker
The color wheel is a little complicated. You should first understand the HSL color space. I will explain basic HSL concepts, if can refer to above link for accurate info.
Like RGB color space, HSL also represents three components of color, that is hue, saturation and lightness. So HSL color space is also three-dimensional space, actually it is cylindrical geometry. In each cylinder, the angle around the central vertical axis corresponds to ‘hue’, the distance from the axis corresponds to ‘saturation’ and the distance along the axis corresponds to ‘lightness’ or ‘brightness’. Check image below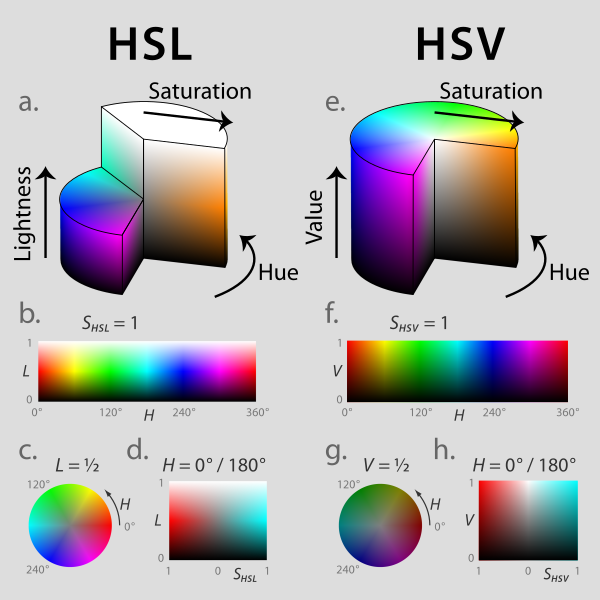
With the definition of HSL, we can calculate color for each position of the wheel with the following code:1
2
3
4
5
6
7
8
9
10float xdis = i - center.x;
float ydis = j - center.y;
float hue =atan2f(xdis, ydis);
if (hue < 0) {
hue += 2* M_PI;
}
hue = hue / (2*M_PI);
float saturation = sqrtf(xdis * xdis + ydis * ydis) / radius;
float brightness = 1.0;
UIColor* color = [UIColor colorWithHue:hue saturation:saturation brightness:brightness alpha:1.0];
###Improvement
If we draw the color wheel in drawRect method of our view, then everytime we update the view, we need to recaculate the color for each pixel and the calculation is time-consuming. To improve the performance, we need first to draw the color to an image, and draw the image to screen in drawrect, so we only need to do the calculation once, update the view many times with good performance. Quartz2d has bitmap context graphics which can be used to draw pixels into an image. Code is like below, you can refer to ios document for more information.1
2
3
4
5
6
7
8
9
10
11
12
13
14
15
16
17
18
19
20
21
22
23
24
25
26
27
28
29
30
31
32
33
34
35
36
37
38size_t width = COLOR_PANE_WIDTH;
size_t height = COLOR_PANE_HEIGHT;
size_t bitsPerComponent = 8;
size_t bytesPerRow = 4 * COLOR_PANE_WIDTH;
void* data = malloc(bytesPerRow * COLOR_PANE_HEIGHT);
CGColorSpaceRef colorSpace = CGColorSpaceCreateDeviceRGB();
CGContextRef bitmapContext = CGBitmapContextCreate(data, width, height, bitsPerComponent, bytesPerRow, colorSpace, kCGImageAlphaPremultipliedLast);
float halfWidth = COLOR_PANE_WIDTH / 2.0f;
float halfHeight = COLOR_PANE_HEIGHT / 2.0f;
float radius = halfWidth;
CGPoint center;
center.x = COLOR_PANE_WIDTH / 2.0f;
center.y = COLOR_PANE_HEIGHT / 2.0f;
for (int i = 0; i < COLOR_PANE_WIDTH; ++i) {
for (int j = 0; j < COLOR_PANE_HEIGHT; ++j) {
float xdis = i - center.x;
   float ydis = j - center.y;
   float hue =atan2f(xdis, ydis);
   if (hue < 0) {
      hue += 2* M_PI;
    }
   hue = hue / (2*M_PI);
   float saturation = sqrtf(xdis * xdis + ydis * ydis) / radius;
   float brightness = 1.0;
   UIColor* color = [UIColor colorWithHue:hue saturation:saturation brightness:brightness alpha:1.0];
CGContextSetFillColorWithColor(bitmapContext, color.CGColor);
CGContextAddRect(bitmapContext, CGRectMake(i, j, 1, 1));
CGContextFillPath(bitmapContext);
}
}
mpWheelColorImg = [[UIImage alloc] initWithCGImage:CGBitmapContextCreateImage(bitmapContext)];
CGColorSpaceRelease(colorSpace);
char* data2 = CGBitmapContextGetData(bitmapContext);
CGContextRelease(bitmapContext);
if (data2 != NULL) {
free(data2);
}
Wish this will help you, if you have any question or there’s any errors in this blog, please leave a comment :)