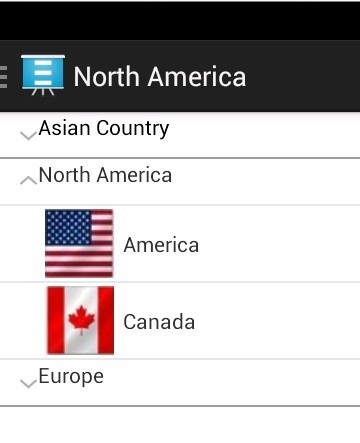
ListView is commonly used when we want to display a list of elements, there are two kinds of List views in Android, ListView and ExpandableListView. ExpandableListView is a subclass of ListView, both of them need an ListAdapter to provide data and view for each row. Usually we need to subclass ArrayAdapter for ListView, for ExpandableListView we subclass BaseExpandableListAdapter. In this tutorial I will focus on how to custom our own ExpandableListView. I will cover ListView and different kinds of adapters later.You can find the source code of the demo project here.The screen of the demo is like below,From the image, you can see what ExpandableListView is like, there are some groups in it, and each group may have some children.
 .
.
To custom a ExpandableListView, we need to define a layout for its group, and a layout for children in each group. Let’s first create an list_group.xml, there’s only one textview to display the group name. If you want to do further customization, for example you want to change the group indicator icon, you can also add an image view here to use as group indicator (you can call setGroupIndicator() method of ExpandableListView to change groupIndicator).1
2
3
4
5
6
7
8
9
10
11
12
13
14
15
<?xml version="1.0" encoding="utf-8"?>

<LinearLayout xmlns:android="http://schemas.android.com/apk/res/android"
              android:orientation="vertical"
              android:layout_width="match_parent"
              android:layout_height="match_parent">
<TextView  android:id="@+id/groupname"
           android:layout_width="match_parent"
           android:layout_height="30dp"
           android:layout_marginLeft="25dp"
           android:textAlignment="viewStart"
           />

</LinearLayout>
For children in group, we need an imageView to display national flag, and a textview to display country name1
2
3
4
5
6
7
8
9
10
11
12
13
14
15
16
17
18
19
20
21
22
23<?xml version="1.0" encoding="utf-8"?>
<RelativeLayout xmlns:android="http://schemas.android.com/apk/res/android"
android:orientation="vertical"
android:layout_width="match_parent"
android:layout_height="match_parent">
<ImageView android:id="@+id/rowImg"
android:layout_width="wrap_content"
android:layout_height="wrap_content"
android:layout_gravity="center_vertical"
android:paddingEnd="6dp"
android:paddingLeft="30dp"
android:layout_centerVertical="true"
android:src="@drawable/ic_launcher"
/>
<TextView android:id="@+id/rowText"
android:layout_height="50dp"
android:layout_width="wrap_content"
android:gravity="center_vertical"
android:layout_centerVertical="true"
android:layout_toRightOf="@id/rowImg"
/>
</RelativeLayout>
With these two layout we can subclass BaseExpandableListAdapter to create our own adapter. There are four main methods we need to override:
- public int getGroupCount(); return total number of groups;
- public int getChildrenCount(int groupNo);return number of children in groupNo;
- public View getGroupView(int i, boolean b, View view, ViewGroup viewGroup); create view for group title;
- public View getChildView(int i, int i2, boolean b, View view, ViewGroup viewGroup);create view for each row of group i;
After we set an adapter for a ListView, android will draw the ListView at some time, using the data and view provided by the adapter. It will first call getGroupCount and getChildCount to know how many groups are there, and how many children in each group. Then for each group, it will call getGroupView to get the view for the group header and add it to view hierarchy, it will also call getChildView for each row in the group. Android also will do some optimiazaion, for rows that is currenlty out of screen, android will create them only when they are scrolled into screen, so we can make some optimization when coding, reusing already created views. Here are how I override getGroupView and getChildView, here we will use the two layouts defined before. You can refer the source code for detail.1
2
3
4
5
6
7
8
9
10
11
12
13
14
15
16
17
18
19
20
21
22
23
24
25
26
27
28
29
30
public View getGroupView(int i, boolean b, View view, ViewGroup viewGroup) {
View head = view;
if (head == null)
{
LayoutInflater inflater = (LayoutInflater)mcontext.getSystemService(Context.LAYOUT_INFLATER_SERVICE);
head = inflater.inflate(R.layout.list_group, null);
}
TextView text = (TextView)head.findViewById(R.id.groupname);
text.setText(this.mData.getGroup(i).getHeadTitle());
return head;
}
public View getChildView(int i, int i2, boolean b, View view, ViewGroup viewGroup) {
View row = view;
if (row == null)
{
LayoutInflater inflater = (LayoutInflater)mcontext.getSystemService(Context.LAYOUT_INFLATER_SERVICE);
row = inflater.inflate(R.layout.list_row, null);
}
TextView rowtext = (TextView)row.findViewById(R.id.rowText);
rowtext.setText(((ArrayList<RowInfo>)(this.mData.getRowsForGroup(i))).get(i2).getRowItem());
ImageView imageview = (ImageView)row.findViewById(R.id.rowImg);
imageview.setImageResource(((ArrayList<RowInfo>)(this.mData.getRowsForGroup(i))).get(i2).getmImg());
return row;
}
Next step you will want to add event listener for your listView, you can subclass ExpandableListView.OnChildClickListener and ExpandableListView.OnGroupClickListener for child and group click event respectively.
Wish this will help :)