KISS

尊重 谦虚 宽容


  • 首页

  • 分类

  • 归档

  • 标签

  • 关于

OTA install link for android apk file on IIS server

发表于 2013-10-10   |   分类于 Android   |  

It’s very convinent to provide an OTA install link for QE to install your apk file. With IIS server, it’s easy to do this.

  • first we need to add a MIME type in IIS server, file extension:.apk, MIME tpe:application/vnd.android.package-archive
  • copy apk file to you website directory
  • add a hyperlink pointed to your apk file.
Multiple selection List View

发表于 2013-09-28   |   分类于 Android   |  

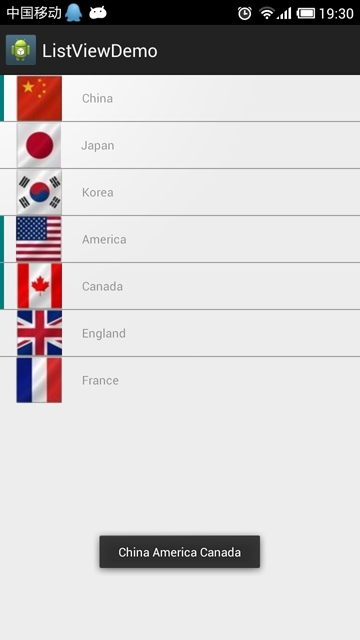
ListView is also a kind of AdapterView, and is very alike ExpandableListView, which has been introduced in last post. To custome a ListView, we need to provide a layout file for elements in the listView, and a adapter class to provide data for ListView. In the demo project, I wrote a multiple selection ListView, I used my own logic to enable multiple selection, which is different from methods using checkbox. The screenshot of the demo is like below.multiple selection listView

Each row there are three views, one ImageView used as indicator to indicate whether an element is selected or not, one ImageView for country flag and a textView to display country name. The definition of the layout is not complicated, you can refer the code for detail.

When we subclass ArrayAdapter class, we need to override two method, public int getCount() which returns the number of elements in the ListView and public View getView which populate view for each element. In order to enable multiple selection, we need to manage the selected items by ourselves, we can use an ArrayList to achieve this easily, only with methods below:

1
2
3
4
5
6
7
8
9
10
11
12
13
14
15
16
17
18
19
20
21
22
23
24
25
26
27
28
29
30
31
32
33
34
//check if pos is selected
public int isSelected(int pos)
{

for(int i = 0; i < this.selections.size(); ++i)
{
if (this.selections.get(i).intValue() == pos)
return i;
}
return -1;
}

//when user clicks an element in ListView, we need to update selecion info
public void updateSelection(int pos)
{

int index = this.isSelected(pos);
if(index == -1)
{
this.selections.add(pos);
}
else
{
this.selections.remove(index);
}
}

//return all selected items, just for toast to display.
public String getAllSelectedItem()
{

String result = " ";
for(int i = 0; i < this.selections.size(); ++i)
result += this.model.get(this.selections.get(i).intValue()).country + " ";

return result;
}

In our OnItemClickListener of ListView, we have to update the selection, and let listView redraw itself to chagne the state of the indicator drawable.

1
2
3
listAdapter.updateSelection(arg2);//update selection
listAdapter.notifyDataSetChanged();
Toast.makeText(MainActivity.this, listAdapter.getAllSelectedItem(), 1).show();

Android Expandable List View Tutorial

发表于 2013-09-25   |   分类于 Android   |  

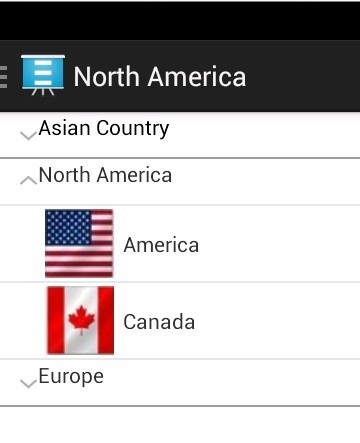
ListView is commonly used when we want to display a list of elements, there are two kinds of List views in Android, ListView and ExpandableListView. ExpandableListView is a subclass of ListView, both of them need an ListAdapter to provide data and view for each row. Usually we need to subclass ArrayAdapter for ListView, for ExpandableListView we subclass BaseExpandableListAdapter. In this tutorial I will focus on how to custom our own ExpandableListView. I will cover ListView and different kinds of adapters later.You can find the source code of the demo project here.The screen of the demo is like below,From the image, you can see what ExpandableListView is like, there are some groups in it, and each group may have some children.

App Screen.

阅读全文 »

Learning android fragment

发表于 2013-08-31   |   分类于 Android   |  

Fragment is introduced in android API Level 11, it is designed for more feasible GUI layout.If you want to design UI layout like Master-Detail Application in iOS, fragment is very suitable. We can use a list fragment on the left to display some item, when user select on item, we will show the detail information on the right fragment. Layout of Master-Detail Application is like the left part of the below image:

Master-Detail Application

Fragment is also very useful for smart-phones app. When we need to change the content of the screen, we don’t need to use a new Activity, instead we can use fragments for app screen switches, which is much more light-weight than switches between Activities.

Just like Activity, fragment also has lifecycle states, and it’s very important for you to know when the state of a fragment will be change, and will change to which state, before you use fragments. I provided a very simple project here, which contains the basic fragment usage. The screen of the simple project, and how screens switch is indicated below:

App Screen

阅读全文 »

Github pages with google analytics

发表于 2013-08-03   |   分类于 Octopress   |  

Google analytics is another tool google provides us, which is very useful to track your website information. You can see how many visitors come to your website, the country of these visitors, keywords visitors used to search your site, and much other info. Of course it’s very convinent to use, and very easy to integrate with Github pages blog.

Just following steps below you can use google analytics for you website:

1.go to Google Analytics to create an account, or you can log in with your google account.

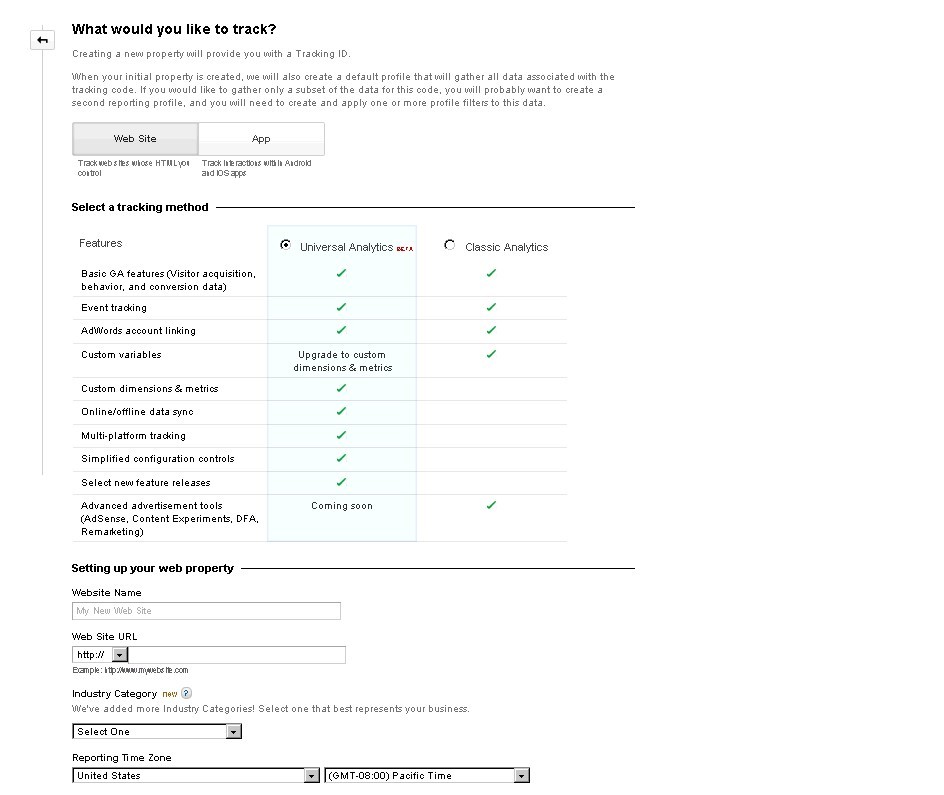
2.after you log in, you can see the page below, where you will enter your website information. You just need to input your web site url, if you don’t have sepecial setting. Then click blue button “Get Track ID” in the below

configure website information
3.Browse to your website directory (github page branch), find default.html in your theme, and Add google analytics track script in the tag, then you can see all data about visitors of your website in google analytics.

Android Activity and Dialog communication

发表于 2013-07-28   |   分类于 Android   |  

Dialogs are used a lot in user-friendly mobile apps. You may want to display to user some message, or want to provide users some options. When we use dialog in android app, we often need to communicate between pop-up dialog and the underlying activity, we want to get users’ choice or want to react when user selects an option. If you are using an inner class dialog in the Activity, the communication is simple, because inner class (The dialog) can access members of main class(The activity). In this post, I am talking about communication between custom dialog and the activity, dialog defined in its own .java file.

I will give two methods for passing value back from dialog to activity.

###Use Handler and Message mechanism
Handler and Message is easy to use if there’s not much data to pass. The mechanism is easy, we pass a handler in the activity to the dialog, when we create the dialog, when user interact with the dialog, for example, if user clicks OK button, then we can use the handler to send a message, and process this message in the handleMessage function, which is defined in the activity class. Below is the code:

First is a custom dialog class:

1
2
3
4
5
6
7
8
9
10
11
12
13
14
15
16
17
18
19
20
21
22
23
24
25
26
27
28
29
30
31
32
33
34
35
36
37
38
39
40
41
42
43
44
45
46
47
public class PauseDialog extends Dialog {
Button resumeBtn = null;
Button mainMenuBtn = null;
Handler mhandler;

public PauseDialog(Context context) {
super(context);
}

public PauseDialog(Context context, int theme) {
super(context, R.style.pause_game_dialog_style);
}

public void setHandler(Handler handler) {
this.mhandler = handler;
}

@Override
protected void onCreate(Bundle savedInstanceState) {
super.onCreate(savedInstanceState);
setContentView(R.layout.pause_game_dialog);
resumeBtn = (Button) findViewById(R.id.resume_button);
mainMenuBtn = (Button) findViewById(R.id.mainmenu_button);
resumeBtn.setOnClickListener(onClickListener);
mainMenuBtn.setOnClickListener(onClickListener);
}

View.OnClickListener onClickListener = new View.OnClickListener() {
@Override
public void onClick(View view) {
if (view.equals(resumeBtn)) {
//TODO: Resume game
Message msg = new Message();
msg.what = MainActivity.HANDLER_RESUME;
PauseDialog.this.mhandler.sendMessage(msg);
PauseDialog.this.dismiss();

} else if (view.equals(mainMenuBtn)) {
//TODO return to main menu
Message msg = new Message();
msg.what = MainActivity.HANDLER_MAINMENU;
PauseDialog.this.mhandler.sendMessage(msg);
PauseDialog.this.dismiss();
}
}
};
}

阅读全文 »

Android Game Loading Screen Design

发表于 2013-07-21   |   分类于 Android   |  

Almost every game has a loading screen, not because loading screen is beautifule, of course make it beautiful is necessary, because it is the first screen presented to users, but we need loading screen to load necessary resources, such as bitmap or drawable, which will make our app slow if we don’t load them before hand. Below is an example of loading screen:
Loading Screen Example

We can see the screen is simple, just a progress bar and a background image, may be you can also put a text above the progress bar to indicate loading process.

###Loading Screen Layout
The layout of loading screen is simple, like below:

1
2
3
4
5
6
7
8
9
10
11
12
13
14
15
16
17
18
19
20
21
22
23
24
25
26
27
28
29
30
31
32
33
34
<?xml version="1.0" encoding="utf-8"?>
<RelativeLayout xmlns:android="http://schemas.android.com/apk/res/android"
android:layout_width="fill_parent"
android:layout_height="fill_parent"
android:orientation="vertical" android:background="@drawable/loading">


<ProgressBar
android:id="@+id/pb_progressbar"
style="?android:attr/progressBarStyleHorizontal"
android:layout_width="fill_parent"
android:layout_height="wrap_content"
android:progressDrawable="@drawable/colorprogress"
android:layout_alignParentBottom="true"
android:layout_centerHorizontal="true" android:layout_marginBottom="20dip" android:layout_marginLeft="20dip" android:layout_marginRight="20dip" android:layout_marginTop="10dip"/>


<TextView
android:id="@+id/tv_loadingtext"
android:layout_width="wrap_content"
android:layout_height="wrap_content"
android:layout_above="@+id/pb_progressbar"
android:layout_centerHorizontal="true"
android:text="Loading, please wait..."
android:textAppearance="?android:attr/textAppearanceMedium" android:textColor="#ffffffff" android:shadowColor="#000000" android:shadowDx="2.0" android:shadowDy="2.0" android:shadowRadius="3.0"/>


<TextView
android:id="@+id/tv_progress"
android:layout_width="wrap_content"
android:layout_height="wrap_content"
android:layout_alignBottom="@+id/pb_progressbar"
android:layout_centerHorizontal="true"
android:text="Loading..."
android:textAppearance="?android:attr/textAppearanceSmall" android:textColor="#ffffffff" android:shadowColor="#000000" android:shadowDx="2.0" android:shadowDy="2.0" android:shadowRadius="3.0"/>


</RelativeLayout>

We just create a relative layout with a background image and put progress bar and textview at some position. You may also need to custom your own progressbar, you can find many posts about progressbar on the web.

阅读全文 »

Memory Usage Investigate of iOS View Render

发表于 2013-07-13   |   分类于 iOS   |  

These days I spent some time investigating how iOS manages memory for view and image rendering. That is, if we draw a view or image on the screen, how much memory will be cost by this operation. I want to know this, because I want to accurately manage(estimate) memory used by our app.
There are two tools we can use to see memory used by one app, one is Activity Monitor provded by Instruments, the other is TOP, which is a useful tool of linux platform. If you want to use TOP to see memory, you have to jailbreak you iPad/iPhone, and install TOP, then you can use ssh to connect to your device and use top.

###Memory used by View Rendering

In one tech session of WWDC 2011, an apple SE mentioned that, if a view override drawRectmethod, then iOS will create an backstore for it. That means for every view who override drawRect, if we add it to the view hierarchy, it will cost view.frame.width * view.frame.height * 4 bytes memory of the system.

###Memory used by Image Rendering
Memory used by image rendering is a little complicated. We need to do two things we draw an image.

  • Stage1:Load image data from net or local disk
  • Stage2:Draw image to view using some kind of draw technique

####Memory used by Loading Image
The total memory used by drawing an image also includes memory used by Stage1 and Stage2. In my app, to load an image, I use the following code:

1
2
3
NSData* imgData = [NSData dataWidthContentsOfFile:imgurl];
UIImage* image = [[UIImage alloc] initWidthData:imgData];
....

With this load technique, Mcmory used is almost [imgData Length] bytes, which is different from memory used by loading image from bundle with code UIImage* image = [UIImage imageNamed:imgName];. You can do a test, if you are interested.

####Memory used by image drawing
There are many techniques to draw an image, I mainly focus on two of them

  • draw image to CALayer with [CALayer setContents] method
  • draw image to a rect with [UIImage drawInRect] method

With the first technique, after we call [mLayer setContents:mImage]', we can see memory is increased byimageWidth imageHeight 4` bytes.

With the second technique, I don’t see any obvious memory growth except memory used by the view that the image is drawn to(I override drawRect method of that view, and call [UIImage drawInRect] there).

If you have any idea how iOS manages rendering memory, welcome to leave me a comment, I am interested in that :).

Draw your own ColorPicker for iOS

发表于 2013-07-05   |   分类于 iOS   |  

Several weeks ago, I wrote a custome color picker for iphone app, I mainly use Quartz2d Graphics drawing the view. The function is simple, just allow user to select a color. Today I will make a summary for this work, you can download the demo project here. You need XCode4.6 to compile this project.

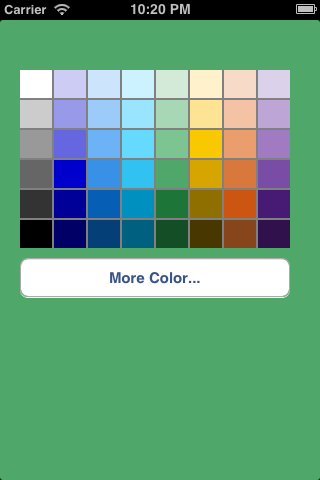
There are two types of Color picker. One is GridColorPicker which contains colored rectangles in rows and columns. Each rectangle in grid represents one color, user can click one rect to make a selection. The other is WheelColorPicker, all color is in a circle, user can click to select a hue, then use a vertical bar to select a color.

Here are sceenshot(you can use button below to change between these two views).The background color changes with color user selected.

gridColorPicker WheelColorPicker

###Grid Color Picker
For grid color picker, we just need to first get positions of all rects and corresponding color. Then draw these colored rects in drawRect method. Code snippet(not complicated, you can refer to the source code for detail):

1
2
3
4
5
6
7
8
9
10
11
12
13
14
15
- (void)drawRect:(CGRect)rect
{
CGContextRef context = UIGraphicsGetCurrentContext();
CGContextSetFillColorWithColor(context, [UIColor grayColor].CGColor);
CGContextFillRect(context, rect);
for (int row = 0; row < COLOR_GRID_ROW; ++row) {
for (int col = 0; col < COLOR_GRID_COL; ++col) {
UIColor* color = [self colorFromInt:LESS_COLOR_TABLE[row * COLOR_GRID_COL + col ]];
CGRect colorRect = [[colRectArray objectAtIndex:COLOR_GRID_COL * row + col] CGRectValue];
CGContextSetFillColorWithColor(context, color.CGColor);
CGContextAddRect(context, colorRect);
CGContextFillPath(context);
}
}
}

阅读全文 »

UITextView

发表于 2012-12-10   |   分类于 iOS   |  

These days I am working on UITextView, before we want to make copy/paste available we use UILabel instead of UITextView. UILabel is a good way to show texts, unless you want it to be editable, because UILabel is much faster than UITextView. Now I will summize some points of UITextView, welcome everybody to add more.

IPadding

The first thing that confused me was the padding of UITextView, there are always paddings around texts of UITextView, the size of paddings is related to font size. In my app, I want to remove these paddings, and here are two ways. UITextView is inherited from UIScrollView, so we can use the property contentInset.

1
textview.contentInset = UIEdgeInsetsMake(-8,-8,0,0);

use this code, we can remove left and top paddings, maybe you will change the numbers according to you font. In my experiments, ‘-8’ is good for most situations. But I haven’t find ways to remove right and bottom paddings, if you know, plean leave comment below.

The other way is ,we can add TextView as a subView of an instance of UIView, which we set clipToBounds = YES.

1
2
3
4
5
CGFloat padding = 8;
CGRect newFrame = CGRectMake(-padding, -padding, oldFrame.bounds.size.width + 2*padding, oldFrame.bounds.size.height + 2*padding);
textView.frame = newFrame;
UIView* container = [[UIView alloc] initWithFrame:oldFrame];
[container addSubview:textView];

阅读全文 »
1…345
Charles

Charles

41 日志
5 分类
52 标签
© 2016 Charles
由 Hexo 强力驱动
主题 - NexT.Pisces